Question blocks and management groups
Properties can be displayed in various places on the website. For example, on the profile page, in the search overview, or in a category page. We display these properties with question blocks. These exist for the properties of profiles but also for the properties of items from a management group.
Generally, there are two types of question blocks, namely for the thumbnail and for the detail page. The thumbnail is the tile used in overviews. For example, the search overview or a category page. The detail page is the profile page of a user or the page of an item.
Per management group, you can determine which question blocks are used for thumbnail and detail. For the profile page, these are already added by default. These are Profile and Thumbnail; you can change these but not add them yourself.
A question block consists of a header with one level of properties below it. Except on the profile page, where you can create multiple headers with properties below them.
Add question block
Make sure you have first created questions for the correct management group and in the correct question group. Then follow these steps to create question blocks:
1. Go to SiteCMS > Matchmaker > Question blocks. You will now see an overview of all question blocks
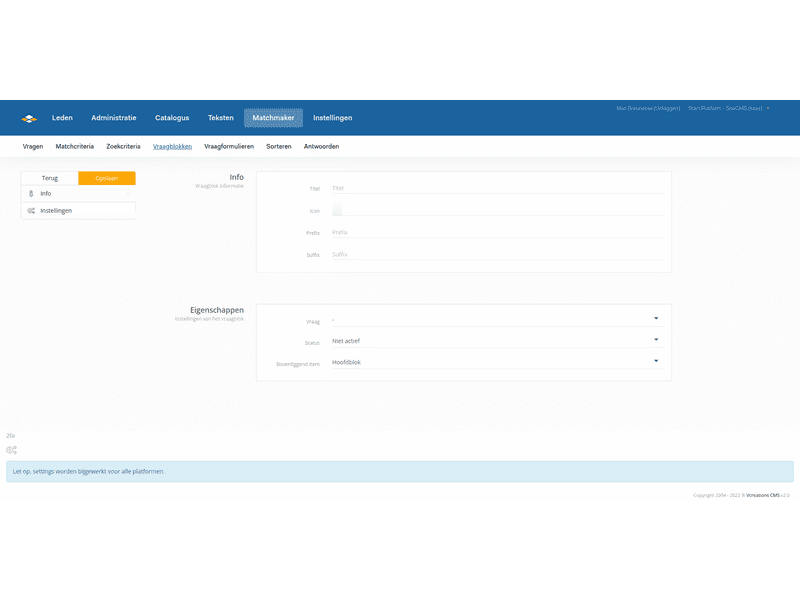
2. Click on new to first add the header of your question block
a. For a header, only fill in the title. For example, use the name of the management group in combination with thumbnail or detail
b. Set the status to active and click save
3. Click on new to create new properties that will be displayed under this header.
a. Fill in the title of the header at title; this title will be displayed for the property that the user has filled in.
b. Choose a desired/appropriate icon at Icon
c. Skip prefix and suffix
d. Select the question you want to use to display.
e. Set the status to active.
f. Choose the header we created in step 2 at the parent item. This determines in which question block the property will appear
g. Click save to save the changes


